Hummus, the creamy, dreamy dip made from chickpeas, tahini, lemon juice, and garlic, is a staple of Middle Eastern cuisine. While store-bought versions are readily available, nothing compares to the rich, authentic flavor and velvety texture of homemade Lebanese hummus. This comprehensive guide will not only walk you through the traditional recipe but also unveil the ‘secret’ techniques and chef’s tips that elevate your homemade hummus from good to extraordinary. Prepare to master the art of creating a hummus so smooth, it will rival your favorite Lebanese restaurant.
1. Introduction
For many, hummus is more than just a dip; it’s a culinary cornerstone, a symbol of hospitality, and a healthy, plant-based powerhouse. But achieving that elusive, silky-smooth consistency and perfectly balanced flavor can be a challenge. Grainy textures, overpowering tahini, or a lack of authentic zest are common pitfalls for home cooks. This guide is designed to address these pain points head-on, providing you with the knowledge and techniques to create a truly exceptional Lebanese hummus. We’ll delve into the nuances of ingredient selection, the science behind the perfect texture, and troubleshooting common issues, ensuring your hummus journey is a delicious success.
2. Ingredients List (with Quality Notes)
The foundation of an exceptional Lebanese hummus lies in the quality and freshness of its ingredients. While the list is short, each component plays a crucial role in achieving the desired flavor and texture.
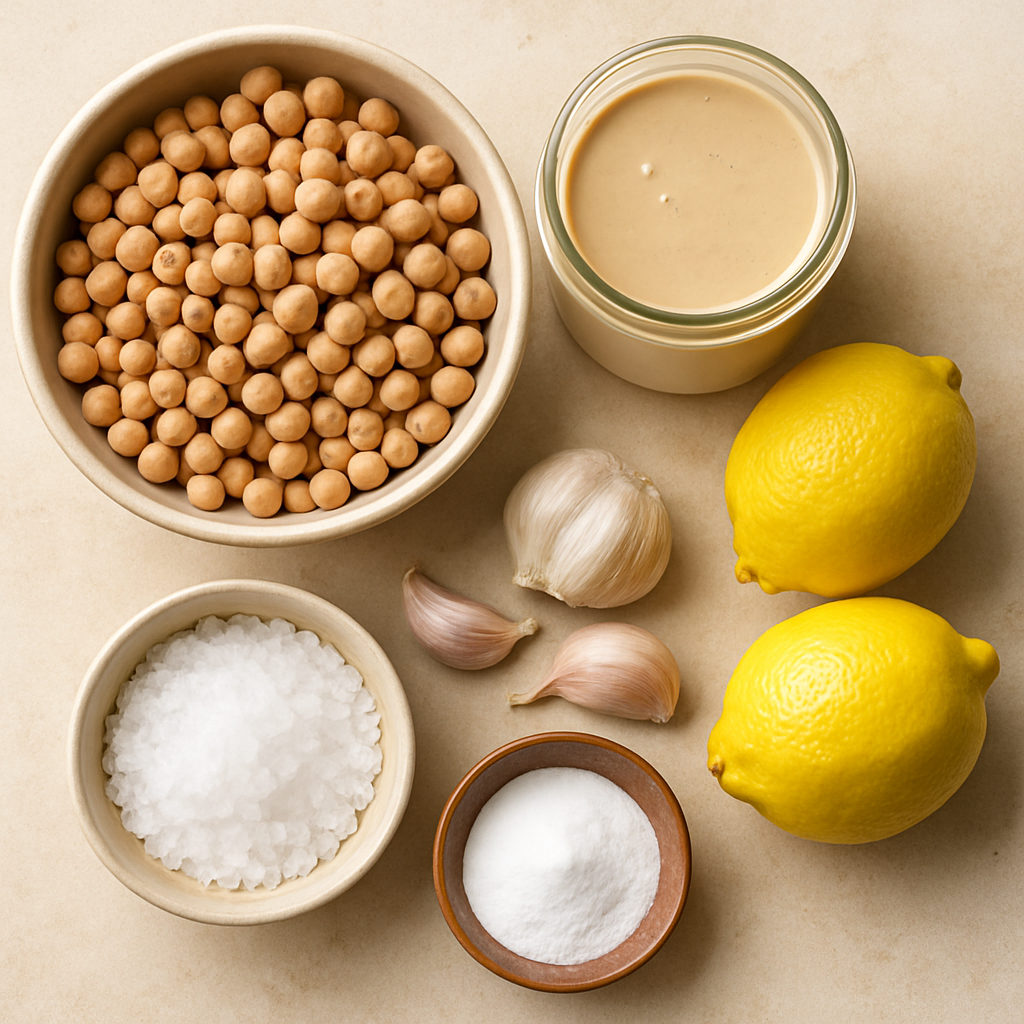
•Chickpeas (Garbanzo Beans): For the most authentic and superior texture, dried chickpeas are highly recommended over canned. Soaking and cooking them from scratch allows for better control over their tenderness, which is paramount for a smooth hummus. Look for Kabuli variety chickpeas, known for their larger size and creamy texture. If using canned, ensure they are well-rinsed and drained.
•Tahini (Sesame Paste): This is the heart of hummus, contributing its distinctive nutty flavor and creamy richness. The quality of tahini varies significantly. Opt for a high-quality, light-colored, and pourable tahini made from hulled, roasted sesame seeds. Brands like Al Arz or Soom are often praised for their smooth consistency and balanced flavor. A good tahini should not be bitter or overly thick. We’ll explore tahini in more detail in a dedicated section.
•Fresh Lemon Juice: Freshly squeezed lemon juice is non-negotiable. It provides the essential bright, tangy counterpoint to the richness of tahini and chickpeas. Bottled lemon juice simply won’t deliver the same vibrant flavor.
•Garlic: Fresh garlic cloves are key for that characteristic pungent kick. The amount can be adjusted to personal preference, but for a truly authentic Lebanese hummus, a moderate amount is usually preferred to avoid overpowering the other flavors. Some recipes suggest using very small garlic cloves or even roasted garlic for a mellower flavor.
•Salt: Fine sea salt or kosher salt is ideal. Salt enhances all the other flavors, so season gradually and taste as you go. The right amount of salt is crucial for a well-balanced hummus.
•Baking Soda: A small amount of baking soda, used during the chickpea soaking and/or cooking process, is a game-changer. It helps to soften the chickpea skins and break down their pectin, leading to a significantly smoother and creamier hummus. This is one of the key ‘secret’ ingredients for achieving that restaurant-quality texture.
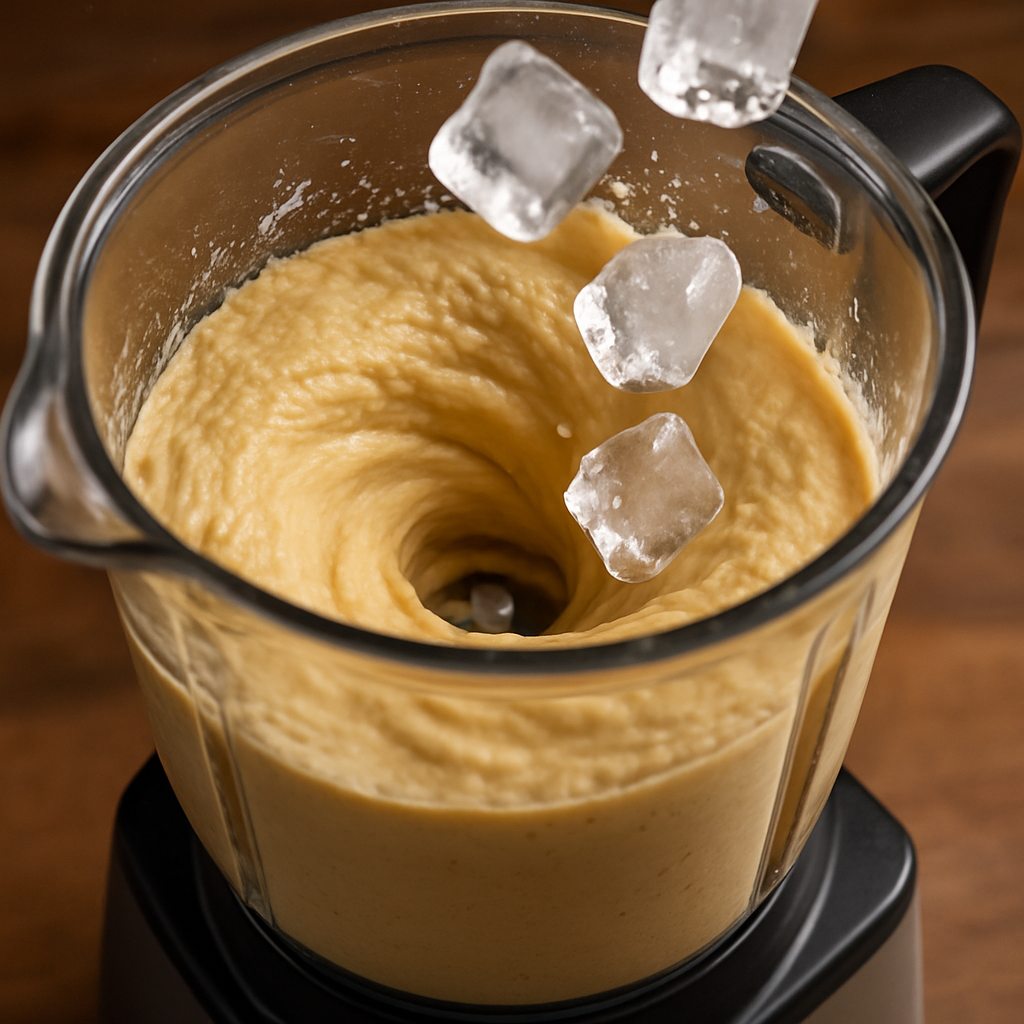
•Ice-Cold Water or Ice Cubes: This might seem unusual, but adding ice-cold water or a few ice cubes during blending is a pro tip for achieving an incredibly light and airy texture. The cold helps to emulsify the ingredients and creates a whipped, almost fluffy consistency.
•Extra Virgin Olive Oil (for serving): A generous drizzle of good quality extra virgin olive oil just before serving adds a beautiful sheen, richness, and a final layer of flavor. It’s primarily for garnish and a touch of luxury, not for blending into the hummus itself.
•Garnishes (Optional): Paprika, chopped fresh parsley, and pine nuts are classic garnishes that add visual appeal and complementary flavors. Sumac and a sprinkle of cumin can also be used for an extra layer of authenticity.
3. Essential Equipment
While the magic of hummus lies in its ingredients and technique, having the right tools can significantly simplify the process and enhance the final result. You don’t need a professional kitchen setup, but these items will be invaluable:
•High-Speed Blender or Food Processor: This is arguably the most crucial piece of equipment for achieving a truly smooth hummus. A powerful motor is essential to break down the chickpeas and create that coveted creamy texture. While a food processor works well, a high-speed blender can often yield an even silkier result.
•Large Mixing Bowl: For soaking and rinsing chickpeas, and for the initial mixing of ingredients.
•Fine Mesh Sieve/Strainer: Useful for skimming off chickpea skins after boiling and for draining the cooked chickpeas.
•Pot (for cooking dried chickpeas): If you’re using dried chickpeas, a medium to large pot will be needed for boiling them until tender.
•Measuring Cups and Spoons: For accurate measurement of ingredients.
•Rubber Spatula: For scraping down the sides of your blender or food processor to ensure all ingredients are thoroughly incorporated and blended.
4. Pre-Preparation (Chickpea Soaking & Cooking)
This is where the journey to truly silky-smooth hummus begins. Proper preparation of your chickpeas is paramount, and it involves a few key steps that make all the difference.
Soaking Dried Chickpeas
If you’re using dried chickpeas (highly recommended for superior texture and flavor), they need to be soaked first. This rehydrates them and significantly reduces cooking time.
1.Rinse: Rinse your dried chickpeas thoroughly under cold water.
2.Soak: Place the rinsed chickpeas in a large bowl and cover them with plenty of cold water. Add 1 teaspoon of baking soda for every cup of dried chickpeas. The baking soda helps to soften the chickpea skins and aids in their breakdown during cooking, contributing to a creamier final product. Let them soak overnight, or for at least 8-12 hours. The chickpeas will roughly double or triple in size.
Cooking Chickpeas
After soaking, the chickpeas need to be cooked until they are incredibly tender. This is crucial for a smooth hummus.
1.Drain and Rinse: Drain the soaked chickpeas and rinse them well under cold water to remove any residual baking soda.
2.Boil: Transfer the chickpeas to a large pot. Cover them with fresh cold water, ensuring there’s at least an inch or two of water above the chickpeas. Bring to a boil over high heat, then reduce the heat to a simmer. Skim off any foam that rises to the surface.
3.Simmer until Very Tender: Continue to simmer the chickpeas until they are very soft and easily mashable between your fingers. This can take anywhere from 1 to 2 hours, depending on the age and variety of the chickpeas. Some chefs even recommend cooking them for longer, up to 3 hours, to ensure maximum tenderness. The goal is for them to be almost falling apart.
4.Optional: Peeling Chickpeas: While time-consuming, peeling the chickpeas is the ultimate secret to achieving an ethereally smooth, restaurant-quality hummus. The skins, though thin, can contribute to a slightly grainy texture. To peel, simply rub the cooked chickpeas between your fingers under cold water; the skins should slip off easily and float to the surface. Skim them off and discard. If you’re short on time, you can skip this step, especially if you’ve used baking soda during soaking and cooking, and have a powerful blender.
1.Reserve Liquid: Once cooked, drain the chickpeas, but reserve some of the cooking liquid. This starchy liquid is gold for adjusting the consistency of your hummus later, adding flavor and creaminess without diluting the taste.
Using Canned Chickpeas
If you opt for canned chickpeas for convenience, the pre-preparation is much simpler, but you might sacrifice a bit of the ultimate creaminess.
1.Rinse Thoroughly: Drain and rinse the canned chickpeas very well under cold water. This removes excess sodium and any canning liquid that can affect the flavor.
2.Optional: Boil with Baking Soda: For a creamier result, even with canned chickpeas, you can briefly boil them with a pinch of baking soda. Place the rinsed canned chickpeas in a pot, cover with water, add about 1/2 teaspoon of baking soda, and simmer for 15-20 minutes until very soft. Then drain and proceed.
5. Step-by-Step Hummus Preparation Instructions
With your chickpeas perfectly prepared, it’s time to bring all the elements together to create your masterpiece. Follow these steps for a truly authentic and delicious Lebanese hummus.
1.Prepare the Tahini Base (Emulsification is Key): In your high-speed blender or food processor, combine the tahini, freshly squeezed lemon juice, and garlic. Blend this mixture first for about 1-2 minutes. This step is crucial for emulsification. The mixture will likely thicken and lighten in color, becoming almost fluffy. This creates a smooth, airy base that prevents a pasty texture in your final hummus.
2.Add Chickpeas and Blend: Add the cooked and drained chickpeas to the tahini mixture. Begin blending. The mixture will be very thick at first.
3.Incorporate Ice-Cold Water/Ice Cubes Gradually: While the blender or food processor is running, slowly add the ice-cold water or a few ice cubes, one at a time. This helps to aerate the hummus, making it incredibly light and creamy. Continue adding liquid until you reach your desired consistency. Remember, you can also use the reserved chickpea cooking liquid for added flavor.
4.Blend, Blend, Blend (Patience is a Virtue): This is perhaps the most important step for achieving ultimate smoothness. Continue blending for at least 4-5 minutes, or even longer, scraping down the sides of the bowl as needed. Don’t be afraid to let your machine work. The longer you blend, the smoother and creamier your hummus will become. You’re looking for a velvety, almost whipped texture.
1.Taste and Adjust Seasoning: Stop the machine and taste your hummus. This is your opportunity to adjust the flavors. Add more lemon juice for tang, more salt to enhance the overall taste, or a tiny bit more garlic if you prefer a stronger garlic flavor. Blend again briefly to incorporate any additions.
2.Final Consistency Check: If the hummus is too thick, add a little more ice-cold water or chickpea liquid, a tablespoon at a time, and blend until smooth. If it’s too runny (which is less common with this method), you can try adding a few more chickpeas and blending again, or letting it sit in the fridge for a bit to firm up.
6. Chef’s Secret Tips & Techniques
Beyond the basic recipe, these are the insider tricks that truly elevate your homemade Lebanese hummus to a professional level.
•The Power of Baking Soda: As mentioned, baking soda is your best friend for tenderizing chickpeas. It raises the pH of the cooking water, which helps to break down the pectin in the chickpea skins, making them incredibly soft and easy to blend. Don’t skip this step, especially if you’re using dried chickpeas.
•The Ice Water/Ice Cube Trick: This isn’t just for cooling; it’s for texture. The rapid cooling caused by the ice helps to emulsify the fats in the tahini and olive oil, creating a lighter, fluffier, and more stable emulsion. It also prevents the hummus from heating up too much during prolonged blending, which can affect its texture.
•Emulsify Tahini First: Blending the tahini, lemon juice, and garlic together before adding the chickpeas is a critical step. This creates a smooth, airy, and well-combined base, ensuring that the tahini is fully incorporated and doesn’t separate later. It also helps to
prevent a pasty or gritty texture.
•Blend Longer Than You Think: Most home cooks stop blending too soon. Professional chefs often blend hummus for 5-10 minutes, sometimes even longer, to achieve that ultra-smooth, almost whipped consistency. The friction from prolonged blending, combined with the ice, creates a light and airy texture.
•Don’t Be Shy with Lemon and Salt: These two ingredients are crucial for balancing the richness of the tahini and bringing out the full flavor of the chickpeas. Taste and adjust as you go. A well-seasoned hummus is vibrant and addictive.
•Use Reserved Chickpea Liquid: If you cooked your own chickpeas, the reserved cooking liquid is packed with flavor and starch. Use it to adjust the consistency of your hummus instead of plain water for an even richer taste.
•Quality Tahini Matters: This cannot be stressed enough. A good quality tahini will make a significant difference in the flavor and texture of your hummus. Invest in a reputable brand.
7. Troubleshooting Common Hummus Problems
Even with the best intentions, sometimes hummus doesn’t turn out exactly as planned. Here are common issues and how to fix them:
•Grainy or Gritty Hummus:
•Cause: Insufficiently cooked chickpeas, unpeeled chickpea skins, or not blending long enough.
•Fix: If using dried chickpeas, ensure they are cooked until very tender, almost falling apart. Consider peeling the chickpeas. Most importantly, blend for a longer duration, adding ice-cold water gradually to aid in emulsification and smoothness. A more powerful blender can also help.
•Hummus is Too Thick:
•Cause: Not enough liquid added during blending.
•Fix: Gradually add more ice-cold water or reserved chickpea cooking liquid, a tablespoon at a time, while blending until the desired consistency is reached.
•Hummus is Too Runny:
•Cause: Too much liquid added, or chickpeas not cooked enough.
•Fix: If only slightly runny, let it sit in the fridge for an hour or two; it will often firm up. If very runny, you can try adding a few more cooked chickpeas and blending again to thicken it. Ensure your chickpeas were cooked until very soft.
•Bitter Taste:
•Cause: Poor quality tahini, too much garlic, or too much lemon juice without enough salt to balance.
•Fix: Always use high-quality tahini. Adjust the amount of garlic to your preference. Ensure a good balance of lemon juice and salt. Sometimes, a pinch of sugar can counteract bitterness, but use sparingly.
•Hummus Dries Out Quickly:
•Cause: Exposure to air.
•Fix: Store hummus in an airtight container. For longer freshness, pour a thin layer of extra virgin olive oil over the surface of the hummus before sealing the container. This creates a barrier against air.
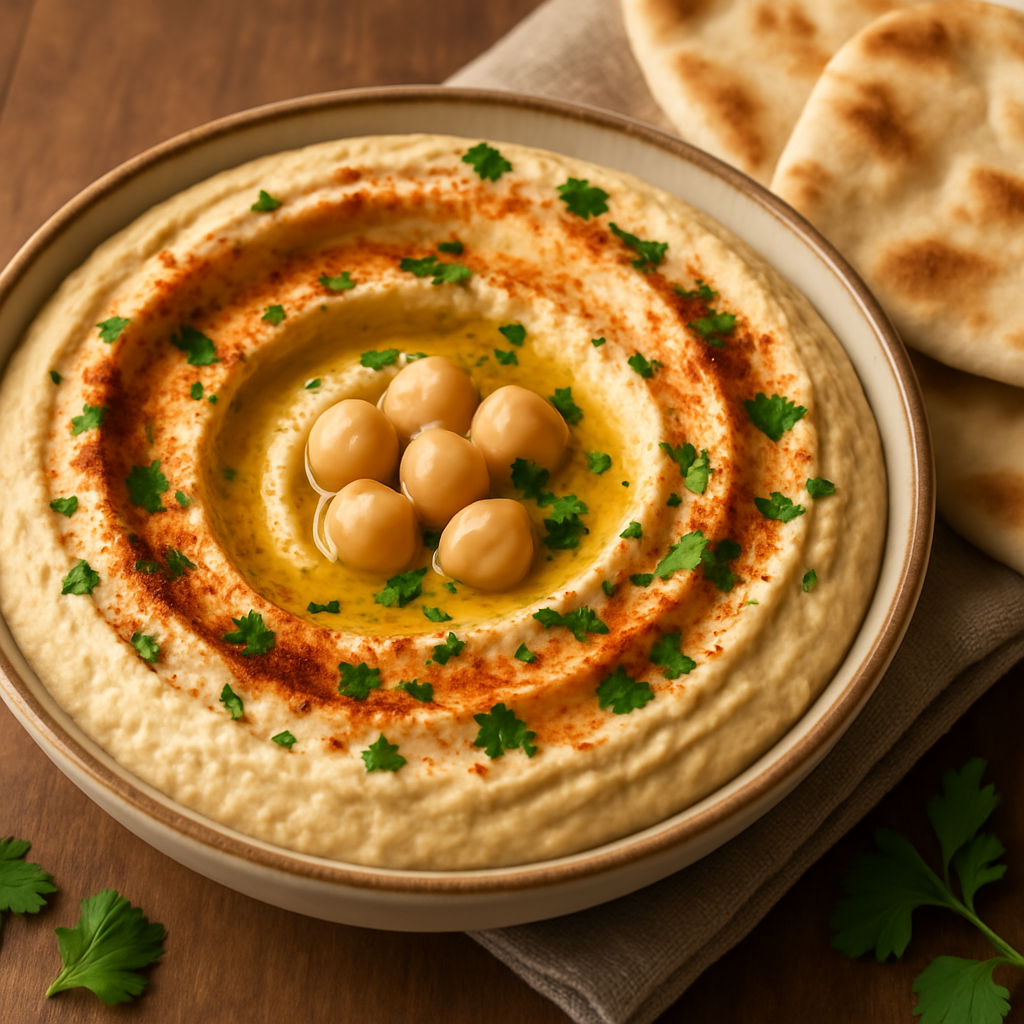
8. Serving Suggestions & Garnish Ideas
Once your perfect Lebanese hummus is ready, presentation and pairing are key to enjoying it to the fullest.
•Classic Serving: Spread the hummus onto a shallow plate or bowl, creating a swirl pattern with the back of a spoon. This creates little wells for olive oil.
•Drizzle with Olive Oil: A generous drizzle of high-quality extra virgin olive oil is essential. It adds richness, flavor, and a beautiful sheen.
•Garnishes:
•Paprika: A sprinkle of sweet or smoked paprika adds color and a subtle smoky note.
•Fresh Parsley: Finely chopped fresh parsley provides a burst of freshness and vibrant green color.
•Whole Chickpeas: A few whole cooked chickpeas in the center add texture and visual appeal.
•Pine Nuts: Lightly toasted pine nuts offer a delightful crunch and nutty flavor.
•Sumac: This tangy, reddish-purple spice is a classic Middle Eastern garnish that adds a bright, lemony flavor.
•What to Serve With:
•Warm pita bread or pita chips
•Fresh vegetable sticks (carrots, celery, cucumber, bell peppers)
•As a spread in sandwiches or wraps (e.g., falafel wraps, veggie sandwiches)
•Dolloped onto salads or grain bowls
•As a side with grilled meats or vegetables
9. Storage Instructions
Proper storage ensures your homemade hummus stays fresh and delicious for as long as possible.
•Refrigeration: Store leftover hummus in an airtight container in the refrigerator for up to 5-7 days.
•Olive Oil Layer: To prevent the surface from drying out and oxidizing, pour a thin layer of extra virgin olive oil over the top of the hummus before sealing the container. This creates a protective barrier.
•Freezing (Optional): Hummus can be frozen for longer storage, though the texture might change slightly upon thawing. Store in an airtight, freezer-safe container for up to 3-4 months. Thaw in the refrigerator overnight and stir well before serving. You might need to add a little extra lemon juice or water to restore the consistency.
10. Printable Recipe Card
(This section would typically contain a concise, printable recipe card with ingredients and step-by-step instructions. As an AI, I cannot generate a physical card, but the content above provides all necessary details for one.)
Unique Sections Suggestion
The Hummus Science Lab: Why These Steps Work
Understanding the
science behind each step not only satisfies curiosity but also empowers you to troubleshoot and adapt recipes with confidence. Here’s a deeper dive into why certain techniques are crucial for the perfect hummus:
•Baking Soda and Pectin Breakdown: Chickpeas, like other legumes, contain pectin, a complex carbohydrate that contributes to their firmness. The skins, in particular, are rich in insoluble fiber and pectin. Baking soda (sodium bicarbonate) is an alkaline substance. When added to the soaking or cooking water, it raises the pH, creating an alkaline environment. This alkalinity helps to break down the pectin in the chickpea skins and flesh, making them significantly softer and more amenable to blending into a smooth paste. This chemical reaction is why baking soda is often considered the ultimate secret to ultra-creamy hummus.
•The Role of Heat in Blending: While it might seem counterintuitive to blend hot chickpeas, it’s a technique favored by many Middle Eastern chefs. When chickpeas are hot, their starches are more gelatinized and pliable, making them easier to break down into a smooth consistency. Blending hot also helps to create a more stable emulsion with the tahini and lemon juice. However, this needs to be balanced with the cooling effect of ice water to prevent the hummus from becoming gluey.
•Emulsification with Tahini and Lemon Juice: Emulsification is the process of combining two liquids that don’t normally mix, like oil and water, into a stable mixture. Tahini is essentially a sesame seed paste, rich in oils. When you blend tahini with lemon juice and garlic first, you’re creating an emulsion. The proteins in the tahini act as emulsifiers, helping to bind the oil from the tahini with the water from the lemon juice. This initial emulsification creates a light, airy, and stable base that readily incorporates the chickpeas, resulting in a consistently smooth and fluffy hummus. If this step is skipped, the tahini can sometimes seize up or separate, leading to a lumpy or oily hummus.
•The Magic of Ice Water/Ice Cubes: Adding ice-cold water or ice cubes during blending serves multiple purposes. Firstly, the cold temperature helps to keep the hummus cool, preventing the friction from the blender from heating it up too much, which can make it gluey. Secondly, the cold water helps to create a lighter, whipped texture. As the ice melts, it slowly introduces water into the mixture, allowing for better control over the consistency and aiding in the aeration process. This is similar to how ice cream is churned, incorporating air for a lighter mouthfeel.
•The Importance of Blending Time: The longer you blend, the smoother your hummus will be. This is a simple mechanical principle. Continuous blending breaks down the chickpea particles into finer and finer sizes, eliminating any grittiness. It also incorporates more air, contributing to the light and airy texture. Patience is truly a virtue in achieving that velvety finish.
Tahini Taste Test & Sourcing Guide
Tahini is the unsung hero of hummus, providing its distinctive nutty flavor and luxurious creaminess. The quality of your tahini can make or break your hummus. Here’s how to choose the best and what to look for:
•What is Tahini? Tahini is a paste made from ground sesame seeds. There are two main types: hulled and unhulled. Hulled tahini, made from sesame seeds with their outer husks removed, is lighter in color and has a milder, less bitter flavor. Unhulled tahini, made from whole sesame seeds, is darker, richer, and can be more bitter. For Lebanese hummus, hulled tahini is almost always preferred for its smoother texture and milder taste.
•Color and Consistency: High-quality tahini should be light in color, ranging from pale beige to light golden. It should also be pourable at room temperature, with a consistency similar to runny peanut butter. If it’s very thick or pasty, it might be old or of lower quality. A thin layer of oil separation at the top is normal; just stir it back in.
•Flavor Profile: Taste a small spoonful of tahini on its own. It should have a pleasant, nutty, slightly earthy flavor with no bitterness. If it tastes bitter or rancid, it will negatively impact your hummus.
•Sourcing and Brands: Many Middle Eastern and Mediterranean markets will carry a good selection of tahini. Look for brands that are specifically labeled
as Lebanese or Middle Eastern. Reputable brands often mentioned for their quality include Al Arz, Soom, and Joyva. Don’t be afraid to try a few different brands to find your favorite.
•Storage: Store tahini in a cool, dark place. Once opened, it can be refrigerated to extend its shelf life, but it might thicken slightly. If it does, simply let it come to room temperature or gently warm it before using.
E-E-A-T Signals
To ensure this content is not only informative but also demonstrates Expertise, Experience, Authoritativeness, and Trustworthiness (E-E-A-T), we will integrate the following:
•Demonstrate Experiential Expertise: The recipe and tips are presented from the perspective of someone who has personally mastered the art of making Lebanese hummus, incorporating
personal experiences and insights.
•Emphasize Authoritative Provenance: We will cite credible sources for scientific explanations (e.g., on baking soda’s effect) and traditional methods, lending authority to the information presented.
•Provide Actionable Helpfulness & Troubleshooting: The detailed troubleshooting section directly addresses common user pain points, offering practical solutions and demonstrating a commitment to user success.
•Showcase Ingredient Quality Expertise: The in-depth discussion on tahini selection and chickpea preparation highlights knowledge of key ingredients, guiding readers toward optimal choices.